


Maintaining a vehicle’s electrical system is crucial for its overall performance and longevity. One of the key components of this system is the fuses and relays, which protect the electrical circuits from overloads and malfunctions. Understanding how to safely replace these components can save both time and money, while ensuring your vehicle operates smoothly.
Fuses act as safety devices that interrupt the flow of electricity in case of a fault, while relays serve as switches that control high-current circuits. When these parts fail, it can lead to various electrical issues, leaving drivers stranded or facing costly repairs. Thus, knowing how to identify blown fuses and malfunctioning relays is essential for any car owner.
In this guide, we will provide you with clear and step-by-step instructions on evaluating your vehicle’s electrical system, safely replacing fuses and relays, and tips on troubleshooting common problems. By following these guidelines, you can enhance your understanding of your vehicle’s electrical workings and ensure its reliability on the road.
Identifying Faulty Fuses and Relays in Your Vehicle
Proper maintenance of your vehicle’s electrical system is crucial for optimal performance. Identifying faulty fuses and relays is a key aspect of this process. Begin by examining the vehicle’s fuse box, which is typically located under the dashboard or in the engine compartment. Consult your owner’s manual for the specific location and diagram of the fuse box.
Look for signs of damage or wear on the fuses, such as discoloration or melted plastic. A blown fuse usually has a broken wire or a cloudy appearance within the transparent casing. To test a fuse, you can utilize a multimeter set to continuity mode; a faulty fuse will show no continuity.
Relays, on the other hand, may be more challenging to diagnose. Symptoms of a failing relay include malfunctioning components like headlights, wipers, or fuel pumps. To test a relay, swap it with a similar functioning relay of the same type in the fuse box, if available. If the system now works, the original relay is likely faulty.
Always ensure the vehicle is turned off and the key is removed before inspecting or replacing fuses and relays. This reduces the risk of electric shock and prevents further damage to the electrical system. Regular checks, especially during routine maintenance, can help catch potential issues early on and maintain the reliability of your vehicle.
Step-by-Step Process for Safe Fuse and Relay Replacement
Replacing fuses and relays is a critical task for maintaining the electrical system of your vehicle. Follow these steps to ensure a safe and effective replacement process.
Step 1: Gather Necessary Tools
Before starting, collect tools such as a fuse puller, a multimeter, and replacement fuses or relays that match the specifications of your car’s manual. Ensure you have gloves and safety glasses for protection.
Step 2: Turn Off the Ignition
Begin by turning off the vehicle’s ignition and removing the key from the ignition switch. This prevents any electrical current from flowing while you work on the fuses and relays.
Step 3: Locate the Fuse Box
Identify the location of the fuse box in your vehicle. It is usually found under the dashboard, in the engine compartment, or in the trunk. Consult your owner’s manual for precise locations and diagrams.
Step 4: Identify the Problematic Fuse or Relay
Use the fuse box diagram to locate the specific fuse or relay that needs to be replaced. If you’re unsure, you can test the fuses with a multimeter to verify which one is faulty.
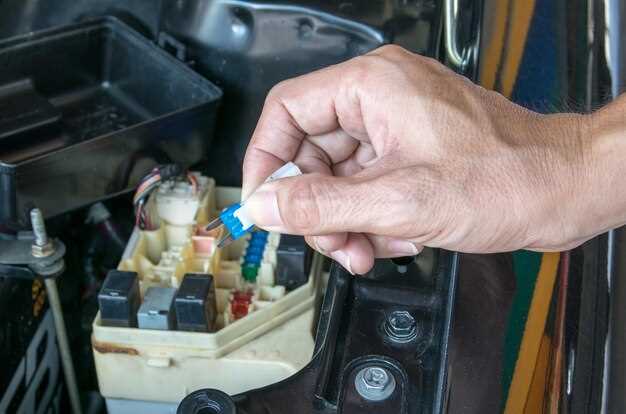
Step 5: Remove the Faulty Fuse or Relay
Using the fuse puller, gently pull out the faulty fuse or relay from its socket. Avoid using excessive force, as this can damage the surrounding components.
Step 6: Inspect the Old Fuse or Relay
Check the removed component for signs of damage. A blown fuse will typically have a broken filament, and a faulty relay may have visible burn marks or corrosion. This helps in understanding why the replacement is necessary.
Step 7: Insert the New Fuse or Relay
Take the new fuse or relay and insert it carefully into the same slot as the old one. Ensure it fits snugly and correctly to establish a proper connection within the electrical system.
Step 8: Test the System
After replacing the fuse or relay, turn on the vehicle’s ignition to test the system. Activate any electrical components associated with the replaced item to confirm they are functioning properly.
Step 9: Dispose of Old Components Safely
Dispose of the old fuses and relays wisely. Check local regulations for electronic waste disposal to ensure environmentally friendly practices.
Step 10: Close the Fuse Box
Once you have confirmed that everything is working correctly, close the fuse box securely to protect it from dust and moisture. Keep the owner’s manual handy for future reference.
Maintaining Your Car’s Electrical System After Replacement

After replacing fuses and relays in your vehicle, it is crucial to maintain the electrical system to ensure optimal performance and longevity. A well-functioning electrical system is essential for the overall reliability of your car.
Regular Inspections: Schedule periodic checks of your car’s fuses and relays. Inspect them for signs of wear, corrosion, or damage. This proactive approach can prevent unexpected failures.
Clean Connections: Dirt and grime can accumulate on electrical connections over time, leading to poor conductivity. Use a contact cleaner to remove any buildup around fuses and relays. Ensure that all connections are tight and free of rust.
Monitor Electrical Load: Be mindful of the electrical load on your system. Overloading can cause fuses to blow and relays to fail prematurely. Upgrade fuses and relays as necessary to match the requirements of added accessories.
Battery Maintenance: A strong battery is fundamental to a healthy electrical system. Regularly check the battery’s charge and clean the terminals to prevent corrosion. Replace the battery according to your vehicle manufacturer’s recommendations.
Keep the Wiring Intact: Inspect wiring for frays, kinks, or signs of wear. Damaged wiring can lead to system malfunctions and shorts, compromising the entire electrical system’s integrity. Address any issues immediately with appropriate repairs or replacements.
Seek Professional Help: If you notice persistent issues with your electrical system after replacing fuses and relays, consult a professional mechanic. Complex problems may require specialized knowledge and tools to resolve effectively.
By implementing these maintenance practices, you can ensure that your car’s electrical system remains robust and reliable after any replacements, minimizing the risk of future problems.

