


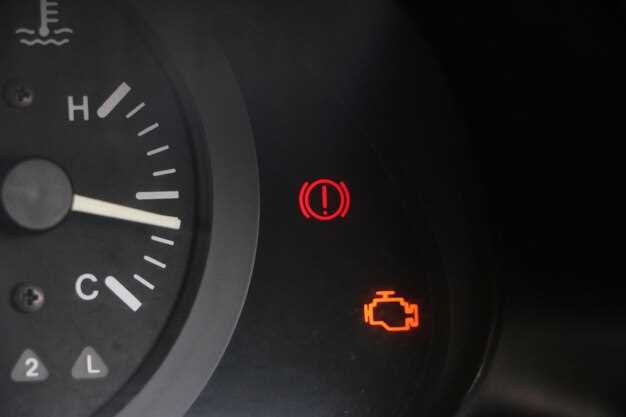
The check engine light is one of the most prominent indicators of a potential error within a vehicle’s engine management system. When this warning light illuminates on your dashboard, it signals that there is an issue that needs to be addressed. Understanding the common reasons for its activation can help drivers take timely action to prevent further damage and costly repairs.
Several factors can trigger the check engine light, ranging from minor issues to significant mechanical failures. Simple problems such as a loose gas cap or faulty spark plugs often lead to false alarms, while more severe concerns like engine misfires or transmission issues require immediate attention. Always consider the context and listen to your vehicle–ignoring these signals can worsen an underlying error and lead to extensive repairs.
In the following sections, we will delve deeper into the most frequent offenders that cause the check engine light to turn on, arming you with the knowledge needed to safeguard your automotive investment. By familiarizing yourself with these common issues, you can make informed decisions and maintain the longevity of your vehicle.
Interpretation of Common Diagnostic Error Codes
The activation of the check engine light on your vehicle’s dashboard often signals the presence of an underlying issue. To diagnose the problem accurately, it’s essential to understand the diagnostic error codes generated by the vehicle’s onboard computer system, typically referred to as OBD-II codes.
OBD-II codes are standardized codes that help mechanics and technicians identify specific malfunctions within the engine, transmission, and other essential systems. Each code consists of a letter followed by four digits, such as P0301 or C1201, where the letter indicates the system affected. For example, “P” codes pertain to powertrain issues, while “C” codes relate to chassis problems.
Common error codes include P0420, indicating a potential issue with the catalytic converter’s efficiency, and P0171, which suggests an imbalance in the air-fuel mixture, often due to a vacuum leak or malfunctioning sensor. Understanding these codes aids in quickly addressing the root cause of the problem rather than just dealing with symptoms.
When encountering a check engine light along with an error code, it’s important to consider the context of the vehicle’s performance, such as unusual noises, decreased fuel efficiency, or changes in acceleration. This information can further guide diagnostics and repairs.
Utilizing an OBD-II scanner, vehicle owners can retrieve these error codes themselves, which empowers them to make informed decisions about necessary repairs or maintenance. However, professional diagnostics may still be required for complex issues that need deeper investigation.
In summary, understanding diagnostic error codes is crucial for maintaining vehicle health. Promptly addressing these coded messages can prevent more severe and costly repairs down the line, keeping the vehicle running smoothly and efficiently.
Frequently Encountered Issues Triggering the Check Engine Light
The check engine light is a crucial indicator of your vehicle’s health. When this light illuminates, it often signals specific errors that require attention. Understanding these issues can help you diagnose problems and avoid costly repairs.
One common issue is a faulty oxygen sensor. This sensor monitors the level of oxygen in the exhaust gases, ensuring optimal engine performance. When it fails, it can lead to inaccurate fuel-air mixtures, which may activate the check engine light. Replacement can resolve the error and improve fuel efficiency.
Another frequent culprit is a defective catalytic converter. This component reduces harmful emissions from the engine. If it becomes clogged or damaged, the engine may struggle to expel exhaust, triggering the check engine light. Addressing this issue is vital for both vehicle performance and environmental compliance.
A malfunctioning mass airflow sensor can also result in activation. This sensor measures the amount of air entering the engine, allowing the computer to determine the right fuel flow. If it sends incorrect data, the engine may run inefficiently, causing error codes to appear. Cleaning or replacing the sensor is often necessary to rectify this problem.
Additionally, spark plug issues can lead to engine misfires, which frequently illuminate the check engine light. Worn or dirty spark plugs fail to ignite the air-fuel mixture efficiently, resulting in reduced engine performance. Regular maintenance and timely replacement of spark plugs can mitigate this error.
Lastly, a loose or damaged gas cap can trigger the light as well. This seemingly minor issue can cause fuel vapors to escape, leading to pressure loss in the fuel system. Checking the gas cap should be one of the first steps when diagnosing a check engine light activation.
Understanding these common errors associated with your engine can significantly aid in troubleshooting and ensuring your vehicle operates efficiently. When the check engine light appears, it is advisable to investigate the error codes using a diagnostic scanner to pinpoint the underlying issue accurately.
Steps to Take After Your Check Engine Light Turns On
When your check engine light illuminates, it’s important to take immediate action to prevent further damage to your vehicle. Here are the steps to follow:
- Assess the Situation:
- Determine if you notice any unusual sounds or behaviors from the engine.
- Check for any loss of power or strange smells.
- Check for Obvious Issues:
- Inspect for loose or damaged gas caps.
- Look for leaks under the vehicle.
- Examine the dashboard for other warning lights.
- Retrieve Error Codes:
- Use an OBD-II scanner to read the engine error codes.
- Document the codes for reference.
- Research the Codes:
- Look up the error codes to understand the possible issues.
- Consult the vehicle’s manual for specific guidance.
- Consider Vehicle Symptoms:
- Evaluate how the vehicle is operating based on the error codes retrieved.
- Identify whether the problem requires immediate attention or can wait.
- Visit a Professional Mechanic:
- Schedule a diagnostic check with a professional if necessary.
- Provide the mechanic with the error codes and any observations.
- Follow Up:
- After repairs are made, monitor if the check engine light remains off.
- Keep a record of any future alerts for reference.
Taking these steps can help ensure that your vehicle remains in good working condition and minimizes unexpected breakdowns.

